07 agosto 2012

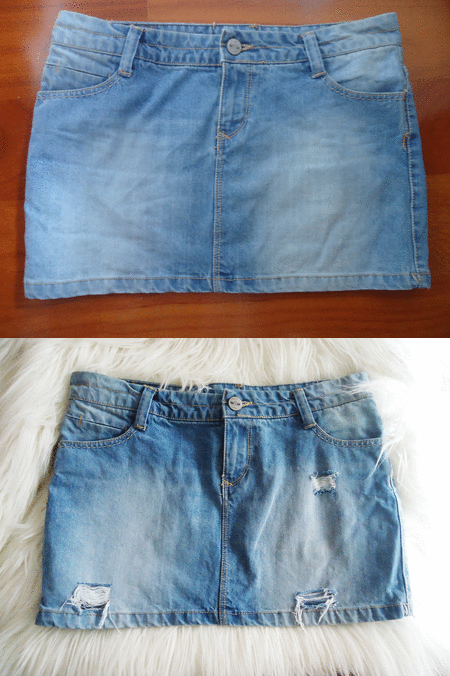
DIY | ripped denim skirt


picture by me

Remember me - strangely - lusting for a ripped mini denim skirt?
Well, I started working on this (rather dull) 4€ skirt I bought on sale, 
using this ripping technique and how cool does it look now?

********

Lembram-se de eu não me calar com uma saia de ganga com rasgões?
Bem, peguei nesta saia de 4€ (sem graça) que encontrei nos saldos e 
comecei a usar a técnica para rasgar ganga que vos mostrei há uns tempos!
Não ficou logo com outro ar?
Não sei se a descolore ou faça aplicações, que vos parece?

picasion.com

12 julho 2012

DIY ripped denim tutorial

tutorial on ripping denim DIY

I promised in this post that I'd make a tutorial on ripping denim!
So here it is:

1. Mark with a pencil or chalk where you want the holes to be
It's best to mark them while wearing them.
It's safer to do some research of locations for them in the web,
to choose the ones you like the most!

2. Cut horizontal lines in the marks
I suggest that you don't make them too narrow,
or you can ruin the fibers in the next step.
You don't have to make them all in the same side,
I suggest you cut some smaller ones in the extremities, 
to make it look more interesting!

3. Pull out some of the horizontal threads (white)
Don't pull too many! Just a few!
You'll be needing them for the ripped appearance.

4. Remove ALL of the vertical threads (blue)
It should be easy after step 3.
Pull them gently, so you don't rip the horizontal ones!

5. Loosen up the fibbers on the edges (the places you didn't rip)
It makes the whole ripping more natural!
You can also use sandpaper!

6. Wash the denim piece
The rips will look even more natural!

So, what are you waiting for? 
Start ripping and give your denim pieces a whole new appeal!
These jeans were the first victim, I have a denim skirt that's gonna go next! :p

********

Prometi neste post que iria fazer um tutorial sobre como fazer rasgões em peças de ganga!
Por isso, aqui está:

1. Marquem com lápis ou giz os locais onde querem os rasgões
É melhor fazerem um "estudo de campo" primeiro, para decidir onde querem fazê-los!
Depois devem marcá-los com a peça vestida!

2. Cortem tiras horizontais nesses locais
A minha sugestão é que não as façam muito estreitas, 
ou podem rasgar todas as fibras nos passos seguintes!
Podem fazer cortes de tamanhos diferentes, 
uma sugestão que faço é fazer tiras mais pequenas nas extremidades,
fica mais natural!

3. Puxem alguns dos fios horizontais (brancos)
Pouquinhos mesmo! Se puxarem demais depois eles soltam-se todos!
(experiência pessoal)

4. Retirem TODOS os fios verticais (azuis)
Quando tirarem fios suficientes no passo 3, é fácil!
Retirem-nos com cuidado, para não rasgar os horizontais!

5. Estiquem o tecido nas margens, para o "soltar"
Também podem lixar os locais ao redor do rasgão, para ficar mais natural!

6. Lavem a peça
A "beleza" do rasgão aumenta depois de lavarem! ;)

Espero que tenham gostado e que comecem a rasgar rasgar! :p
Se tiverem alguma dúvida, just ask! :p

Estas calças foram as minhas primeiras vítimas e não serão as últimas! ;)

Beijinhos
Nádia

14 junho 2012

Rodarte celestial hair clips - DIY


collage my me

Rodarte's gorgeous hair clips are perfect!
Ariel, the mermaid, anyone?
I just cannot stop thinking how pretty one of these would look in my hair!
I'm seriously considering doing something like this!
Wanna do these yourself?
You can use either the Refinery29 video tutorial or follow these instructions!

*******

Estas preciosidades são lindas demais, não é?
Só consigo pensar na Ariel e em como ficariam bem no meu cabelinho! 
Ninguém me quer fazer uma? :p
Sou capaz de me inspirar nestes video da Refinery29 ou nestas intruções!

04 junho 2012

Flower Crown DIY


pictures by me

The moment I laid my eyes on these little flowers on my grandma's jar,
I had to steal some of them to make a (very) rudimental flower crown!
Quite delicate, isn't it?

*******

Quando vi estas florzinhas na jarra da minha avó,
tive de fazer uma flower crown suuuper rudimentar com elas!
Bastou uma agulha, linha e alguma paciência - ah e dedos cheios de pólen! ;)

Que tal, até ficou fofinha, hein?

31 maio 2012

Beauty and DIY | Ombré nails tutorial


pictures taken by me

ring: Parfois

I've been lusting for this type of manicure for ages now, so I decided today was THE day!

It's suuuuper easy, just grab a sponge (I cut a bit from a regular one), put on the second nail polish and apply it gently as you like!
Then, top coat to finish it off!
Pretty cool, right?

*******

Já queria fazer algo assim há séculos e decidi que hoje era o dia!
Tenho muito pouco jeito para estas coisas, por isso não ficou perfeito,
mas adorei na mesma!
Basta arranjar uma esponja (eu cortei um bocado de uma de lavar a loiça :p),
colocar lá o segundo verniz e aplicar com cuidado!
Voilá! Depois é só usar um verniz transparente para uniformizar tudo!
Fica lindo, certo? ;)

13 maio 2012

Denim and pearls - the simplest DIY ever!


1st pic: Fashion Vibe

This is not new. Neither that hard.
But it's still amazing how a simple set of pearls can turn a casual piece 
into a more sophisticated one.
I currently don't have any simple denim jacket to transform, 
but I'll be looking for candidates, that's for sure!

What about you, fancy it or should we leave denim jackets be?

*******

Esta aplicação não é novidade.
Mas, desde que vi a foto da menina loira, com pérolas branquinhas e roxas,
combina com renda, que esta ideia não me sai da cabeça!
É incrível como algo tão simples pode dar logo outro ar a uma peça!
Vou andar à procura de um candidato à transformação! ;)

02 abril 2012

DIY | Dip dye jeans


I have some old jeans at the bottom of my closet that
maybe...just maybe (considering my lack of natural ability for this DIY thing)
I'll be transforming into something like this.
Some advice or tutorials to make things easier? ;)
Thanks

Nádia

*******

Tenho uns jeans justos velhos no fundo do armário e estou a pensar em fazer algo assim.
O jeito não é muito, mas a ver vamos!

Se quiserem dar um empurrãozinho, com conselhos ou algum tutorial,
fico agradecida! :)
Obrigada!

Nádia

28 novembro 2011

They killed the lights!


There's only you and me in the dark. Loose your fears. I'm not the predator here.


pictures taken by me

Split skirt:DIY///Burgundy cardi and sweater:Sfera///Burgundy lace tights:Primark///Necklace:DIY///Booties:Seaside///Rings:ebay and Mango

A giant split and lace tights? Who said I couldn't?

Fashion is all about liberation, about throwing away all your "what if", "should I?" and "what will the people say?". 


The moment I cut this skirt - inspired by this - I knew I was saying "I'm free to wear what I want, the way I want!". 


And doing so, I've created a new piece, that suits me and my winged soul! And fly higher. 
If this ravishing skirt wasn't enough, I wanted to go even wilder and add my burgundy lace tights into the equation! Bold? Yeah! But sooo me!


There are times I actually need this, to walk and walk and walk, and just feel the power crushing the earth. Every women has that in them! The power to shift, to do things their own way. To change. And be themselves.


Outfit apart, I've spent a great weekend - well, at least the first half, that wasn't spend studying! - cuddling with my boy, treating him (he was sick), making his meal for the first time *.* and spoiling him! 


Another week of work lies ahead of me!


Oh, heart, be brave!!!


Good week to all!
KISS
Nádia


*******

Split skirt:DIY///Burgundy cardi and sweater:Sfera///Burgundy lace tights:Primark///Necklace:DIY///Booties:Seaside///Rings:ebay and Mango


Uma racha enorme e meias de renda? Quem é que disse que não posso?


Para mim, a moda é libertação, é esquecer os "será que posso?" e substituí-los por "sou livre de usar o que quero, como quero!".


E no momento que cortei esta saia - como já vos tinha dito aqui - foi isso mesmo que senti.


E depois pensei, "oh, giro giro, era pôr aqui uma rendinha para dar cor!" e pronto, lá vieram as meias da Primark! 


E se soubessem o quanto adorei, o quão forte me senti, a caminhar por Braga nesta indumentária caricata!


Acho que todas as mulheres têm dentro dela o poder de serem únicas, de se destacarem! Só têm de ser elas mesmas!


Deixando este look arrojado de lado, o meu fim-de-semana foi booom - bem, a metade que não foi passada a estudar - houve chocolate quente e muitos miminhos com o boy. Aliás, tive de tomar conta dele porque ficou doentinho, enchi-o de mimos - ele pode comprovar! - e fiz-lhe pela primeira vez uma refeição! (e a minha prática culinária é muuuito pequena, vá, mas ele adorou! :o)


Mais uma semana de trabalho pela frente... Ai, aguenta coração!


Boa semaninha para todos!


BEIJO
Nádia

26 novembro 2011

DIY shirt collar tips


Just like everyone else in the blogosphere, I've been lusting over collar tips for quite a long time now. But I never found a pair that suited my wallet and neither have I see one of Zara's most coveted shirts!

Anyway, when I saw this DIY from Morven I thought: "oh my god, that's an amazing idea!". Making your very own collar tips with card corners! Yay!


*******


Como cerca de 99,9% da blogosfera, tenho andado apaixonada por estes detalhes nas pontinhas das camisas (qual é a tradução para português?). Mas não encontrei um par do qual a minha carteira gostasse, nem a tão cobiçada camisa da Zara.


Por isso, quando vi o DIY que se segue da Morven pensei "olha que rica ideia!"


Fazer as nossas próprias pontinhas com cantinhos dos postais de natal!


So, anyone knows where I can find these kind of cards corners? I've tried ebay, but they were like 5€ and I don't think they were worth it... :/ 

Or, if you're a sweetie, do you know any collar tips that are cheap? (and by cheap I actually mean not more than 7€)


*******


Meninas, sabem onde isto se vende? Em retrosarias? Tentei o ebay, mas ficavam-me por 5€ e à última da hora desisti... :/


Ou então, algumas destas collar tips que sejam baratinhas... Aí coisa para custar menos de 7€, vá! ;)


Digam coisas!

17 novembro 2011

Split me, please!


The moment I saw this DIY from Olivia, I knew this skirt would have the same treatment! You'll see the result sooner or later! ;)


*******


No momento em que vi este DIY da Olivia, sabia que esta saia tinha de sofrer a mesma transformação! Verão o resultado mais cedo ou mais tarde! ;)

22 setembro 2011

Borrow me a telescope - my first GALAXY DIY


Following my galaxy print obsession and absolutely inspiring Marmalade post, I decided to came up with these cosmic leggings using bleach! One of the simpliest DIY ever! Even my sister - who is basically an anti-fashion atm - said they looked amazing! What do you think?

*******

Uma vez que a minha obsessão pelos padrões galaxy continua e eu fui dar com este post do blog Marmalade - um dos meus favoritos, não resisti a ter uns leggings cósmicos a custo zero. E como? Lixívia, tão somente. A ideia mais simples de sempre! Só borrifar a gosto! 

Até a minha irmã - que é um pouco anti-fashion neste momento - gostou deles!

E vocês, o que acham?


Oh, and this black top was just lying there, so he was a victim too! ;)

*******

Ah, e tinha este top a ganhar poeira algures, por isso também ele foi borrifadinho e convertido em material estelar! ;)

pictures taken by me

01 agosto 2011

Outfits | Flowers are dreams awaiting to be picked


I cannot describe how much I love your voice... It hypnotizes me... It disarms me... I’m all yours...


pictures taken by Nádia Sepúlveda (me)

Dress with DIY cut-out:Lefties///Sneakers with DIY ribbons:H&M///Flower headband:DIY

These lovely flowers captivate me and I totally had to put them in my head. So, this romantic hairdo was the result! Felt quite an elf princess. But a bold one, with the opened back! ;)

Love always
Nádia

*******

Vestido com corte DIY:Lefties///Sapatilhas com fitinhas DIY:H&M///Headband de flores:DIY

Estas flores adoráveis cativaram-me e, num impulso, colhi-as e pu-las na cabeça. Este penteado romântico foi o resultado. Senti-me uma princesa dos elfos. Mas uma mal-comportada, hehehe, com as costinhas à mostra! ;) 

Beijo
Nádia

*************************************************

GIVEAWAY RESULT / RESULTADO DA GIVEAWAY: 

And now I have the pleasure to announce the winner of my first ever giveaway with the bijoux brand Jalousie:

*******

E agora tenho o prazer de anunciar a vencedora da minha giveaway com a marca de bijuteria Jalousie:


ANA ANTUNES

Parabéns! Vou-te enviar um e-mail com os detalhes brevemente.

Vais receber a peça escolhida em breve:


03 junho 2011

You've got the lyrics all wrong


Who ever said I wanted to be beautiful??? I don't, I just need to be smart. Oh, and stylish. Always stylish! ;)


pictures taken by Nádia Sepúlveda (me)


DIY cut-out denim shirt:H&M///Leopard skirt:Bershka///Bag:Massimo Dutti/Claw ring:Bershka///Sneakers:Converse///Bow-tie:DXMEPIECE from saboskirt.com

As much as I hate (and believe me, I really do, who likes grainy pictures not on purpose?!) taking pictures indoors, I truly add a great time photographing these - if you couldn't notice that already! I felt so powerful, strong... ;)

One of my favorite sessions, for sure! :)

Oh, and I'm looooving my DIY shirt sooo much! I decided to cut it on the shoulders and to make it longer in the back! Cutting it on the back was a nice idea too, but I thought that enough was enough, hehehe!

I'm going to have my first step into freedom today, my pediatrics exam, wish me the best luck! ;)
KISS 
Nádia

*******

camisa com cortes DIY :H&M///Saia leopardo:Bershka///Mala:Massimo Dutti/Anel de garra:Bershka///Sapatilhas:Converse///Laço:DXMEPIECE a partir de saboskirt.com

Apesar de ODIAR tirar fotos no interior (quem é que gosta de fotografias com efeito grainy não propositado?!), diverti-me IMENSO a tirar estas fotos! O estilo rock/grunge mexe comigo, que hei-de fazer? Senti-me para lá de poderosa! ;)

Definitivamente, uma das minhas sessões preferidas, principalmente porque estou a ser bastante eu! :p

Estou a amaaaar a minha nova camisa DIY! Acho que ficou linda e super cool! Decidi restringir-me aos ombros e à cauda, também pensei nas costas, mas achei corte a mais! ;)

Hoje vou fazer uma das etapas necessárias até à minha liberdade, o exame de pediatria! Desejem-me (muita) sorte, please! ;)

BEIJO
Nádia

02 junho 2011

Scissors meet denim shirt, denim shirt, prepare to die!


This is what happens when I get bored. I cut.

Tomorrow you'll see the result.

*******
Quando estou aborrecida, dá-me para isto. Tesoura, please!

Amanhã vêem no que deu.


Some inspiration:

Fashion Zen

18 maio 2011

The greatest lessons always come from the weirdest teachers


Either it's a fly, a peacock or a flower.


pictures taken by Nádia Sepúlveda (me)

DIY backless top:oooldie from Bershka(?)///Midi skirt:H&M///Coral tights:H&M///Sneakers:H&M///Bag:Massimo Dutti///Flower:can't remember///Necklace:gold chain with an "N"

With my current obsession (not that current, actually) over showing backs, I went for the scissors again and cut a big circle in this OOOOLD top! It made it quite interesting and wearable again!

Oh, and I know I should probably STOP wearing these sneakers and this bag, but I can't help it, they match EVERYTHING! ;)
I was all smiles in this outfit, I couldn't help it! :P

The H&M swimsuit I talked to you about was actually quite disappointing... I only found size 38, but that doesn't really matter, because the fit is all wrong for me... It got too big at the waist and hip, and too small at the boobs... Anyway, it's gorgeous! :/
Not much to add.

Wish you a wonderful and happy day!
Nádia

*******

DIY top flores sem costas:veeelho da Bershka(?)///Saia tule:H&M///Meias salmão:H&M///Sapatilhas:H&M///Bolsa:Massimo Dutti///Flor:não me lembro///Colar:fio de ouro com um "N", de quando era bebé

Derivado desta enorme obsessão que eu tenho com costas ao léu, lá agarrei a tesoura e fiz um grande círculo nas costas deste top para lá de velho. :P Gostei muito do resultado!

Ah, e eu provavelmente devia parar de usar estas sapatilhas e esta bolsa, mas não consigo! :P Ficam bem com tuuudo!!! :O

Fiquei toda sorrisos com esta roupinha, hehehe. E toda bailarina, também! :p

O tríquini da H&M que eu amei foi uma desilusão! Só encontrei o tamanho 38, mas o modelo não dá para mim...buáááá...fica demasiado grande na cintura e na anca e demasiado pequeno no peito! :( Mas continua a ser liiindo!  

Sem nada a acrescentar.

Desejo-vos um dia lindo e sorridente.
Nádia

24 abril 2011

While everyone is crazy over fringes...


I managed to turn an old tee into a version of this trend!

********

De tesourinha em punho é que eu estou bem, peguei nesta t.shirt bem velhota e "enfranjei-a"! Basta ir cortando as tiras à metade e voilá!